How we built a streamlined recording and streaming setup for DF Direct
Lights, camera, green screen.
Earlier this year, we started DF Direct Weekly - initially envisaged as a way to cover more topics and to do so in a way that wouldn't require massive production values. The obvious way to do this is via a simple Microsoft Teams or Zoom meeting - but the results just weren't good enough, not meeting quality thresholds and looking out of place on the DF YouTube channel. At the same time, we were also looking at ways to more easily deliver higher quality filmed material in a 'work from home' environment, where space is at a premium and where time is of the essence.
In addressing the filming challenges of DF Direct Weekly, we ended up creating environments that would hold up not just for the Direct but for interview and DF retro content too. Ultimately, it's all about integrating mirrorless cameras instead of webcams, while tapping into some of the best streaming hardware available. We think that some of the lessons here could be useful shortcuts for anyone that's looking to create a modern, clutter-free way of streaming or recording videos - so this is a breakdown of exactly how our final setup works, from audio and video to lights, capture and controls.
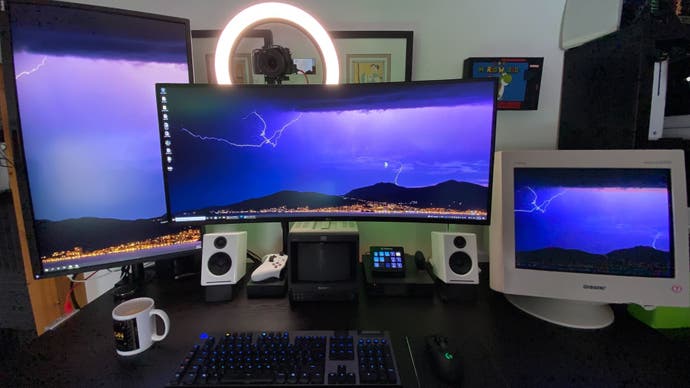
The basic premise here is straightforward enough - we use mirrorless cameras for all filming at Digital Foundry, whether it's for presenting content or producing product shots. We've found the Panasonic Lumix GH5 to be the most powerful cost-efficient mirrorless camera around, and by integrating that into our DF Direct set-ups, we can bypass the Zoom/Teams effect by recording ourselves locally and sharing those files with Audi Sorlie, who typically edits all of the weeklies. Integration of the mirrorless cameras into our workstations varies according to team members, but I was looking for the most optimal, flexible set-up to cover off the main types of filmed content I produce, so I started by mounting everything. I'm using a large Ikea desk with the motorised height feature. I usually use it as a standing desk but I like being able to swap between the two - and this means I need to mount everything directly on the desk.
I ended up using two Elgato Master Mounts to pull this off - one for the main camera and a second optional one for specific product shots, enabling a two-camera system (as well as the Panasonic GH5, I bought a used GH4). It's a simple design but it holds the gear in place and makes it easier to produce such content on the fly. This is great when featuring a handheld system like the Switch or another older machine used for DF Retro - the mount is easier to set up and use than a tripod and allows for quick b-roll filming.

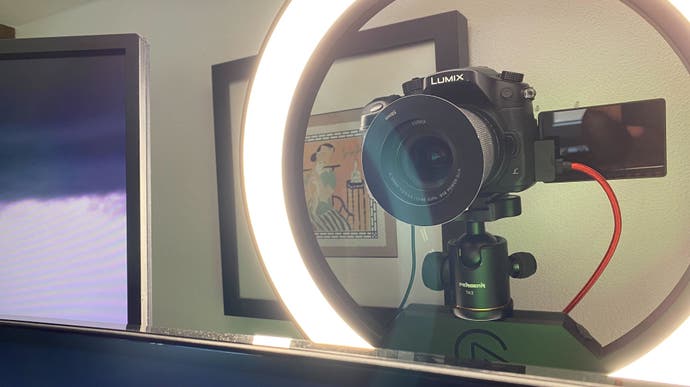
The primary mount, however, is attached to the back of my desk behind my monitors. The monitor, by the way, uses an Ergotron HX monitor mount allowing me to swing this large 38-inch ultra-wide screen around my workspace. The Master Mount holds the Panasonic camera but this is mounted on top of a Ring Light from Elgato. This circular light is massive - using a ring of OSRAM LED lights with a light diffuser covering the entirety of the front lighting area, it allows me to instantly light the scene around my desk. On its own, it provides a solid amount of light for typical on-camera filming - something you can see in every episode of DF Direct Weekly. The challenge, of course, stems from the room itself - it's difficult to deal with a window directly behind your desk, for instance but I think it gets the job done without creating harsh shadows. I've been thinking of adding additional key lights to further boost levels but the Ring Light works pretty well on its own. Rich Leadbetter, Alex Battaglia and now Tom Morgan also use Panasonic cameras mounted within Elgato Ring Lights.
The camera mounts seamlessly in the middle of the Ring Light using an included ball mount. This works well enough but is better suited to smaller cameras, I've found, as it's more difficult to manipulate from my normal position. The weight of the camera and lens is also perhaps asking just a little too much of the standard mounting mechanism. Thankfully it's possible to use your own camera head on the Ring Light allowing for a proper camera mounting system. It works exceptionally well and allows me more easily to swap between my two cameras, when needed.

The camera has an HDMI output that runs straight into the Elgato Cam Link 4K. This uses the clean HDMI output of the Panasonic GH5 (meaning OSD overlays and such can be disabled) which can run for hours when using a dummy battery connected to mains power using an inverter. The Cam Link basically acts a small USB capture device. HDMI is input through one side, while the other is connected to your PC via USB. You can then use the Cam Link in software such as OBS or Elgato's homegrown solution. Using OBS, I link the video from the Cam Link with the input from my microphone to great effect, allowing for simple recording from my desk without needed to manually adjust anything. The microphone I use is one of the oldest parts of the setup, a Samson C01U purchased circa 2011, and it's held in place via a boom arm attached to the left side of the desk. This allows me to swing it into position when I need it, and keep it out of the way the rest of the time.
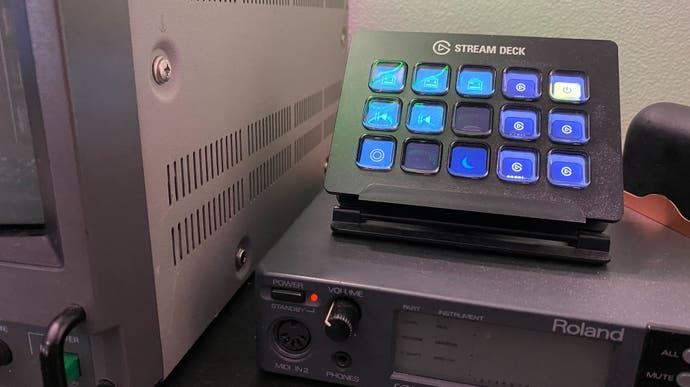
When it comes to lighting and audio management, then, I use the smaller of the two Stream Decks. I have it configured with several different lighting levels and colour temperature choices, since it integrates neatly with the Ring Light, as well as the option to mute various audio channels when doing a livestream. The Deck uses an LCD panel with dividers to create the illusion of 15 unique buttons. Each button can have its own custom graphic assigned via the Stream Deck software, making it easy to tell at a glance what each button does and make changes as necessary to suit new equipment or different use cases.
The final piece of the puzzle is the portable Green Screen. I say portable but this thing is massive, but it's also a lot easier to store. I certainly had no desire to leave a green screen permanently set up in my room and this ended up being the best possible option. I basically roll it out when I need to film an episode of DF Retro. I use a Desview T2 Teleprompter attached directly to the camera - which is easy to remove when not needed. Devices like these use a smartphone or tablet to display scripts, which are reflected onto glass directly in front of the camera lens. Tablet-based teleprompters used to be very expensive, but solutions like this are remarkably cheap by comparison and the inclusion of a remote for scrolling scripts is also very useful.

Taken together, what started out as a way to more easily film DF Direct Weekly without having to spend a long time setting up cameras and lighting has evolved into something far more flexible - a static filming solution that's integrated into my workspace, allowing me to get up and running in moments. While I still wheel out the slider and tripod for larger projects, this desk setup is what makes it possible to do so many other things on the channel. I really enjoy producing developer interviews, and this set-up has proven invaluable in doing that. Likewise with the Switch OLED Model review I put together last week. Green screen filming? Check out the recent F-Zero DF Retro, where I used Unreal Engine 4 to create the backgrounds for the green screen shots filmed with this set-up. Hopefully this demonstrates how versatile this arrangement is, and after living with this set-up for a while I'm not sure I could do without it.

